The Autumnal Maker School [AMS] is over, for me, at least. I built ten things of various materials, and had a good time doing so. But just because I’ve built a number of things in the last three months, doesn’t mean I can’t keep going.
Lately, I’ve been building a number of small mechanical demonstration models, but the challenge they present is how complicated they are to produce in anything other than wood. Cardboard and heavy cardstock, sure… but they’ll barely work long enough to get them out of the workshop, much less all the way home. Accordingly, I’ve wanted to try out a few other mechanical devices that could make a good impression and not take so long to make.
Pulley Card
Enter the Pulley Card. I found this through Pinterest, on Michelle’s Rubber Room (about stamping and paper craft). It’s a nifty little model, that uses paper, ribbon and glue to create a simple pulley mechanism that does some interesting things: displaying a couple of hidden messages to the card-receiver through a simple string mechanic.
Here’s the video.
Not complicated, as you can see. I built two of them this evening; unfortunately I had no 1″ ribbon in stock, so I used two strips of quilled paper in place of the ribbon — and the paper promptly broke the moment I pulled the cards the first time. No good. It really does have to be ribbon.
 Here’s the more-or-less finished card. As you can see, the two tabs easily exit the sides of the card as shown in Michelle’s video. However, on the right hand side you can see a bit of the paper ‘ribbon’ protruding. That’s where and when the paper broke, and I was left with a broken card that couldn’t be sent to anyone. C’est la vie!
Sometimes the things we build don’t work. Sometimes they don’t work the first time. Sometimes they work the first few dozen times, and then they break. This is pretty much normal. It’s a consequence, a feature (not a bug!) caused by living in a world of matter.
In this case, it’s an important material science insight. Sometimes a different material can be substituted for the indicated material. Michelle recommended “sticky strip” for the gluing. I used an Elmer’s CraftBond cartridge. It worked fine on everything. Sometimes, though, you can’t replace one thing with another; in this case, I really needed a piece of plain ribbon rather than a strip of paper.
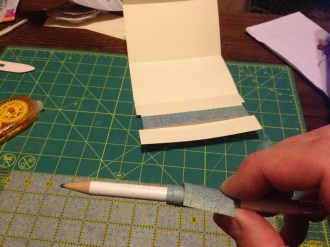
 And here’s one of my process shots. You can see that the two cards are folded properly, that the reinforcement strip has been put in place on both cards. The cards are going to fold up nicely once the slide-out cards are attached in the right places (and boy was that a pain to get right) — the temptation is to put down a lot of glue, but in truth you need only a dab at the inside edge of each card to affix it to the ribbon; otherwise the glued surface gets in the way of the easy operation of the card. Less glue, in this case, is more, and yields a better result. As is usually the case, really: simpler is better.
And here’s the final shot, showing how I worked the paper that would become the ribbons, so that it didn’t stick or jam in the pulley, so it became more flexible than paper usually is, and more like ribbon. It didn’t work. Not every trick or tip or project turns out the way you’d like. This one didn’t. I put in a fair bit of effort on something that should have been easy, and it turned out to be quite difficult, unexpectedly.
All the same, I’m pleased I did this minimum work. I know what sort of materials and effort go into this card, and it’ll be easy to do again. Once I have the right ribbon on hand, anyway.


[…] AMS: Pulley Card […]